Prologue
I’ve recently switched to Emacs for all my development, mainly for the reason that I wanted one IDE to rule them all. I was sick and tired of using Atom, Sublime, Intellij, XCode and occasionally other editors for whatever I was currently working on. Each has its own feel, configuration and key-bindings and while it’s good that they’re suited very well to very specific things, if you’re using a lot of languages you’re going to have a really bad time context switching between them.
Emacs is a one-fits-all solution to programming and of course it also fits Java. That said, Java is a very special case. As you know, Java has very powerful reflection features and IDEs like Intellij or NetBeans use these to live with the language. Intellij is Java and it understands and feels Java. Intellij and Java are like one big living organism, like a Java mushroom. And Emacs, being lisp-based, will never have those mushroom-features. So choosing to use emacs for Java Development means more tradeoffs than for a language like C/C++, where Emacs fits just perfectly. You’re going to have to trade in some of the mushroom-features for the enjoyment of programming Java in Emacs and using all the things we love about Emacs.
That said, let’s get started with setting up Java for Emacs. I am writing this post because I personally needed to get Java up and running in Emacs and it was a horrible, horrible experience. Like so often in Emacs you just have to spend ages and ages to configure things, because well, that’s what having full power of your IDE means. This post attempt to spare you from all the trouble, so that at the end of it you will have a working Java environment that can compile your code, do refactoring, on-the-fly syntax checking and more.
Note: I’m mostly focused on *nix systems, but I hope Windows users can follow too.
Outline
We’ll be covering the following topics:
-
Basic Environment: How to install and use eclim.
-
Compiling: Using Gradle to compile and run your code.
-
Autocomplete: Configure sweet completion features with company.
-
Syntax-Checking: Knowing what you’re messing up at write-time instead of compile-time.
-
Refactoring: Lightweight features that make life more pleasant.
Basic Environment
We’ll start out with discussing the major mode that I found best for Java. There exist a few packages that aim to make Emacs a full Java IDE, the most popular options being the aptly-named JDEE (Java-Development-Environment) as well as the emacs-eclim (eclim for short) package. While JDEE sounds like the go-to option, it seemed more complex, more rusty and less well maintained when compared to other modes, such as eclim. So we’re going to focus on eclim in this post.
About eclim
Now, the funny thing about eclim is that it is one, giant, big hell of a hack. Hear me out. What we’re about to do is run Eclipse in a background server and have emacs as the client. The package then uses the eclim protocol to communicate with Eclipse in the background, enabling project management and semantic features of Eclipse in emacs. At first I thought this was super complex and typical of the kind of hack Emacs is as a whole, but it’s actually ok. Before you start your working day you’ll just have to start up this Eclipse server in the background, but otherwise it’s smooth and comfortable. Also, you can show off to your colleagues what a l33t h4xor you are, which is everyone’s life goal, obviously.
Installing
Eclipse
To get this whole setup rolling we’ll first need Eclipse. If you already have Eclipse installed, you can skip this part. Do make sure you have all the necessary Java extensions, though.
If you don’t have Eclipse, you’re best off just grabbing it from
their website. You can also download it
with your package manager, for example using brew install eclipse eclipse-java
eclipse-ide or sudo apt-get install eclipse eclipse-jdt, but it’s really
easier to just use their installer. Once installed, we can go on to integrating
Eclipse into emacs.
eclim
As mentioned earlier, eclim is a protocol for communicating with an Eclipse server from some client. Originally, that client was vi(m). However, civilized people soon created an emacs port, called emacs-eclim, which is discussed further below.
You can get this core protocol from
eclim.org. They provide a Java Jar file as an
installer. You can then either open the Jar with java -jar ... and follow the
graphical installer (easier), or pass some flags to the call directly to run the
install entirely headless, in the terminal. I used the graphical installer so if
you need to run it headless, consult their website; they provide some
information regarding that path.
The most important thing is that you know where you are putting the eclim and
eclimd executables. The first program, eclim, is what you could use from
the command-line to interface with Eclipse. It sends all the commands to the
server and handles the communication. The emacs mode introduced below wraps
around eclim. The second command, eclimd, is the eclim daemon, which
starts up and manages the server. If you installed eclim properly with the
installer, then eclim and ecilmd should be in Eclipse’s root directory,
e.g. /opt/eclipse on Linux or /Applications/Eclipse.app/Contents/Eclipse on
OS X (but this depends on how you install Eclipse, of course). The installer
will ask you to specify this directory.
What you can already try out at this point is running the Eclipse server by
issuing the eclimd command on your terminal. You should see the server
starting up (quite slowly).
emacs-eclim
Now that we have successfully infected our machine with Eclipse and eclim, we can
spread the infection to Emacs, which was our original goal. For this we now use
the emacs-eclim package.
The simplest way to install this package is through MELPA. So, if you have MELPA
set up you can just pick it off M-x list-packages. If not (why wouldn’t you?),
you can find more information about how to install eclim from their
GitHub page. The steps are quite
straightforward too.
Once you have emacs-eclim installed (you should be able to do M-x eclim-mode),
you’ll want to automatically activate eclim for your Java source files with this
snippet in your emacs config:
(require 'eclim)
(add-hook 'java-mode-hook 'eclim-mode)
Also, if you ever need to modify something about eclimd, you’ll want to
activate specific variables by requiring eclimd:
(require 'eclimd)
Running the Server
Now that you have all the tools installed, we can get started with figuring our
way around eclim. At first, we must always setup our Eclipse server using
eclimd. For this, you can use M-x start-eclimd. If you get an error message
about not being able to start eclimd, then you probably misconfigured your
path. Go check it with M-x customize-variable RET eclimd-executable and set it
to wherever you installed the eclimd executable (check it with which eclimd
if you have to). Alternatively, you can also just run eclimd from the terminal
directly and it’ll to the same thing.
If you ever get a connection: refused error when working with eclim, that is
probably because you forgot to start the server.
Projects
Most often, IDEs will have some sort of concept of a
project. You have that in Intellij, NetBeans and of course also Eclipse. That
is why to do anything with eclim at all you will need to create a project
first. For this, we use M-x eclim-project-create (which you can bind to
whatever you like of course). After issuing this command you’ll be prompted for
a name, a root directory and a nature. Since Eclipse is a general purpose IDE
and not just suited to Java, it supports many languages and those are, more or
less, known as natures. We will want to use the Java nature of course.
If you later want to continue working on your project, you would use M-x
eclim-project-open, where you can select projects by name.
At this point, you should be fully setup with emacs-eclim. You can now, for
example, use M-x eclim-java-refactor-rename-symbol-at-point to rename a symbol
in your Java code.
Compiling
Compilation is best achieved by using a build system such as ant, maven or
Gradle. Emacs-eclim has built-in support for ant and maven so if you are
familiar with those you can use M-x eclim-ant-run to build your ant project,
or M-x eclim-maven-run for the maven equivalent.
As I personally didn’t have much of a history with maven or ant I was free to look around, and found Gradle, which seems to be the hip new kid on the block. Lots of people seem to be saying that it is quite a lot better than maven or ant. I like how fresh it feels and its more intuitive interface in the sense that it is not configured in XML, but in a YAML/Python/Java-like scripting language, which is quite nice. However, I certainly don’t consider myself an expert on this. I just wanted something that worked and Gradle worked for me.
Before I delve into details about Gradle, let me just also very shortly mention
that the simplest way to compile and/or run your Java code is simply with M-x
compile, where you can then type in your standard javac Foo.java Bar.java
followed by another M-x compile with java Foo. But that’s not so intuitive,
is it.
Setting up Gradle
You can get Gradle from their website or via apt-get
install gradle or brew install gradle. You’ll then also want
gradle-mode from MELPA or
wherever. Lastly, enable it whenever it’s Java-time:
(require 'gradle-mode)
(add-hook 'java-mode-hook '(lambda() (gradle-mode 1)))
Once installed, you will need a build-file in your root directory, that must be
called build.gradle. Just a few lines like so will do:
apply plugin: 'java'
apply plugin: 'application'

mainClassName = "Test"

applicationDefaultJvmArgs = ["-ea"]
You’ll want to read their manual of course to see the full list of features, but
I promise you Gradle is quite impressive. What we’re doing up there is setting
up the build file for Java by applying the java plugin (since Gradle can be
used for other languages too). The application plugin we will use to run our
code, as opposed to just building it or creating a jar (which is probably the
easiest thing to do with Gradle). To run our code using the application
plugin, we need to set a main class (we’ll define a Test.java file
later). Lastly I enabled assertions, just as an example.
Using Gradle
I’ll briefly describe how to use Gradle to build your code now, and then show you how it’s done with a practical example.
The most important two commands you will want to know from gradle-mode are
grade-build and gradle-execute. Now, to discuss these commands, let me first
briefly cover what a task is in Gradle. Or actually, I think the Gradle team
itself explains it quite well:
“A task represents some atomic piece of work which a build performs. This might be compiling some classes, creating a JAR, generating Javadoc, or publishing some archives to a repository.”
You can create many, many tasks to do many different things, but the two types of tasks that are probably most interesting right now are building and running. Of course testing is equally important but I will not discuss that today.
Now, the reason why I briefly digressed to talk about tasks is that now it probably makes more sense when I say:
-
gradle-buildexecutes only the build step, i.e. it compiles your classes. -
gradle-executelets you specify which tasks you would like to execute. For example,gradle execute "build"would be equivalent togradle-build. This more general command will be interesting to us because we can then execute theruntask through it. Note that theapplicationplugin supplies theruntask.
Lastly, be warned that like maven, Gradle also expects a standard directory
structure. It will look for production code under src/main/java and for test
source code under src/test/java. I think the distinction between main and
test code is quite sane. The java folders then separate the code from
resources, which would, for example, be under src/main/resources.
Example
I’ll now give an actual example of building and running with Gradle. I have this directory structure:
Test/
├─ build.gradle
└─ src/main/java/Test.java
The build file is exactly the one from above. Let Test.java be this jaw-dropping code:
public class Test {
  public static void main(String... args) {
    for (int i = 0; i < 10; ++i) {
      System.out.println(i);
    }
  }
}
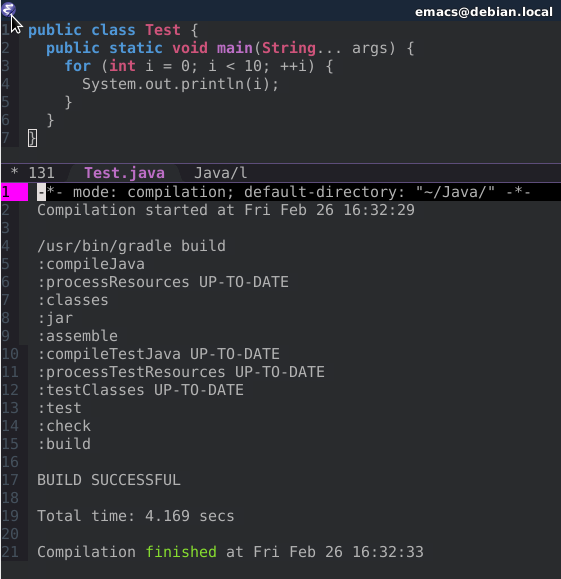
Now when I hit M-x gradle-build, I get:

Oh, sorry, that was actually a picture from lunch (I’m a bad cook). This is what I wanted to show you:
Now, for building and running, i.e. compiling and executing our code, we will
use gradle-execute. We are then prompted about what tasks we wish to run, and
there we write build run, to get those two steps:

For me, this is just perfect. To make our lives nice and sweet we’ll bind
M-x gradle-execute build run to a key-combination in our .emacs file:
(defun build-and-run ()
	(interactive)
	(gradle-run "build run"))

(define-key gradle-mode-map (kbd "C-c C-r") 'build-and-run)
(note that gradle-run is the internal command used by gradle-mode.)
Autocomplete
Now that we know how to do the most basic thing an IDE should do, compiling and running our code, we can add the fancy stuff. First up, let’s have auto-complete. How does this below look to you?
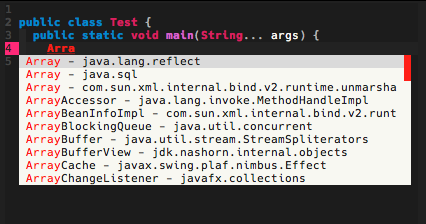
It’s quite easy to setup. Generally in emacs there are two main completion modes: autocomplete and company. We’ll be using company, because it is more configurable and some features of autocomplete don’t work all too well in my experience. It’s actually quite straightforward:
- Setup company in general:
  (require 'company)
  (global-company-mode t)
- Setup company for eclim:
  (require 'company-emacs-eclim)
  (company-emacs-eclim-setup)
Add those two sets of lines to your emacs config and you’re good to go. You can
configure how long company should wait before showing you completions, how it
organizes them and every little detail of its look-and-feel through
M-x customize-mode RET company. You can copy my colors and stuff from here:
(custom-set-faces
 ;; ...
 '(company-preview ((t (:background "black" :foreground "red"))))
 '(company-preview-common ((t (:foreground "red"))))
 '(company-preview-search ((t (:inherit company-preview))))
 '(company-scrollbar-bg ((t (:background "brightwhite"))))
 '(company-scrollbar-fg ((t (:background "red"))))
 '(company-template-field ((t (:background "magenta" :foreground "black"))))
 '(company-tooltip ((t (:background "brightwhite" :foreground "black"))))
 '(company-tooltip-annotation ((t (:background "brightwhite" :foreground "black"))))
 '(company-tooltip-annotation-selection ((t (:background "color-253"))))
 '(company-tooltip-common ((t (:background "brightwhite" :foreground "red"))))
 '(company-tooltip-common-selection ((t (:background "color-253" :foreground "red"))))
 '(company-tooltip-mouse ((t (:foreground "black"))))
 '(company-tooltip-search ((t (:background "brightwhite" :foreground "black"))))
 '(company-tooltip-selection ((t (:background "color-253" :foreground
 "black"))))
 ;; ...
)
Syntax Checking
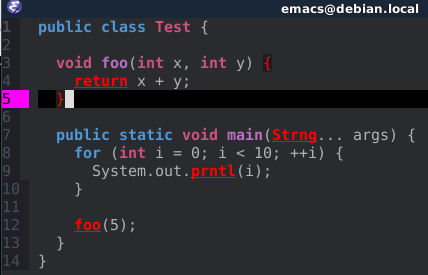
Next, we’ll talk about on-the-fly syntax checks. What we want is to know that we misspelt a symbol’s name or passed the wrong number of arguments to a function, before we even compiled the code. We then also want to be able to see possible corrections for our mistakes. Most modern IDEs have such features, and of course we’ll also have them here.
This feature actually requires no extra modes, but is entirely integrated into
eclim. Already now, when you write eclim-problems- you can see the different
commands (given you have helm or something that completes your mini-buffer
queries …). Just make sure that you are currently in some project (i.e. you
previously executed eclim-project-create or eclim-project-open). Also, note
that often you have to save the file first for things to show up. However, then
you get niceties like this:
When you go over an error with your cursor, you can then use M-x
eclim-problems-correct to select some possible corrections:
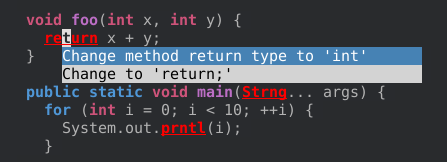
You might want to bind that to something quicker:
(define-key eclim-mode-map (kbd "C-c C-c") 'eclim-problems-correct)
Refactoring
Eclim can also do some lightweight refactoring:
-
Renaming symbols. When over a symbol, hit
M-x
eclim-java-refactor-rename-symbol-at-point
(probably going to want to bind that to something). -
Moving classes between files. Use
M-x eclim-java-refactor-move-classfor this.
For me, (1) is already a bomb. An IDE that can rename symbols for you spares you so much potential trouble you can run into when you have to search-and-replace globally, that it makes me very happy already. Sure, there could be more, but it’s a start.
Epilogue
So, this is it. It was a long and hard journey but in the end, we have in our hands quite a neat piece of IDE. My conclusion is the same as my introduction: Emacs for Java is not a smooth ride. You’ll have to invest time and energy and some features you see in Intellij & Co. are not there yet. But what you will never have in NetBeans or Eclipse is the ecosystem that is Emacs – its configurability and extensibility and the seemingly endless tiny and major optimizations people have made over the years, which are what make Emacs so, so powerful.
I hope this post helped you get Emacs up-and-running as a Java IDE faster in less time than I had to spend accumulating all this knowledge. I’ve condensed at least 100 little problems and questions into this post, that I hope you’ll now not have.
Thanks for reading!